| LIFE OF A GT |
|
|
 | | 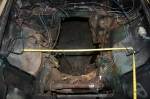 | November 28, 2008 - The nekkid engine bay.
That front subframe has mounting points that are just under 19" apart. The Miata subframe? Right about 32", as the tape measure indicates. One thing's for sure, the new subframe will free up an enormous amount of room. At the expense of a small bit of work.
entry 84 - tags: engine bay, subframe | | | 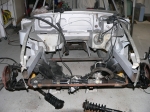 | November 28, 2008 - Here's a shot of the only MGB - that I know of - to be fitted with Miata suspension.
The car was never completed, but it's very useful info. I've shown the rear subframe installation in the past, here's a shot of what was done up front. New frame arms. I'm going to do a little more reinforcing, especially of the upper shock mounts.
This picture also shows how much more potential space there is with the new setup. Combine that with a tubular front subframe like this one and all sort of room opens up.
entry 85 - tags: engine bay, subframe | | | 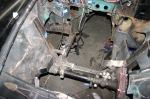 | July 20, 2010 - Welding time!
I've started to panel the engine bay. This will increase the rigidity of the front end, which is my primary goal. You can see the right front corner (on the left in this picture) is done, including some special bulges to clear the control arm. The left rear is also done, leaving a large hole for the headers to pass through. I could make this hole smaller, but then I'd only be able to remove the headers when the engine is out of the car. I can see that particular problem coming back to bite me! For a bit of extra strength, there's also a 1" square tube along the top of the left rear plate.
You can also see the unusually shaped motor mounts, including the one that has to reach over the steering column. Or at least, you could if I'd managed to take the picture in focus.
The engine bay looks pretty awful right now with all the different colors. I also have to admit that some of the welding to the original sheetmetal is not well done. But it'll be strong enough, and a bit of time with the grinder, some seam sealer and a POR-15 paintbrush will make it all look good. First, I have to finish some more patching and a bit more bracing.
entry 356 - tags: engine bay, sheetmetal | | | 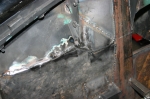 | August 12, 2010 - All of the seams on the cockpit will be sealed with seam sealer to ensure they're air/water tight.
Some of the others in the engine bay - like this one - will simply get ground down before paint. Not all of them need to be, but the ugly ones do. The only piece of stock sheetmetal in this picture is the bit at the upper left with the leftover Aqua paint on it and a little bit at the upper right!
entry 361 - tags: fabrication, engine bay | | | 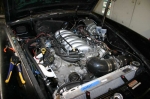 | November 15, 2010 - Here's the current state of the engine bay.
Still some way to go on wiring, but I'm waiting until all the wires are run before covering them up. I'm not sure how to handle the big junction by the fuse boxes, between the MG bullet connectors and the sheer number of wires it's a pretty big bundle. I'm tempted to just build a box to sit over top of it all and hide it from view! Until the car is fully debugged, I'll probably just leave it exposed and ugly.
Currently, I'm in the middle of setting up some relays for the future cooling fans. And in case you're wondering, the note on the rad says "Hook up heater controls" - a reminder to do it when the rad comes out.
entry 454 - tags: engine bay, wiring | | |
|

 THE DIARY